JPGMANAGER
Gestore di grandi archivi fotografici
Image manager for large photo collections
Carica fotografie da più cartelle, lavorale insieme e salva le rotazioni nelle rispettive cartelle di origine. Un tabellone di miniature per ruotare, controllare, eliminare e sistemare le immagini, con anteprima, schermo intero e comandi da tastiera.
Load photographs from several folders, work on them together and save rotations back to their original folders. A thumbnail grid for rotating, reviewing, deleting and editing images, with preview, full screen and keyboard controls.
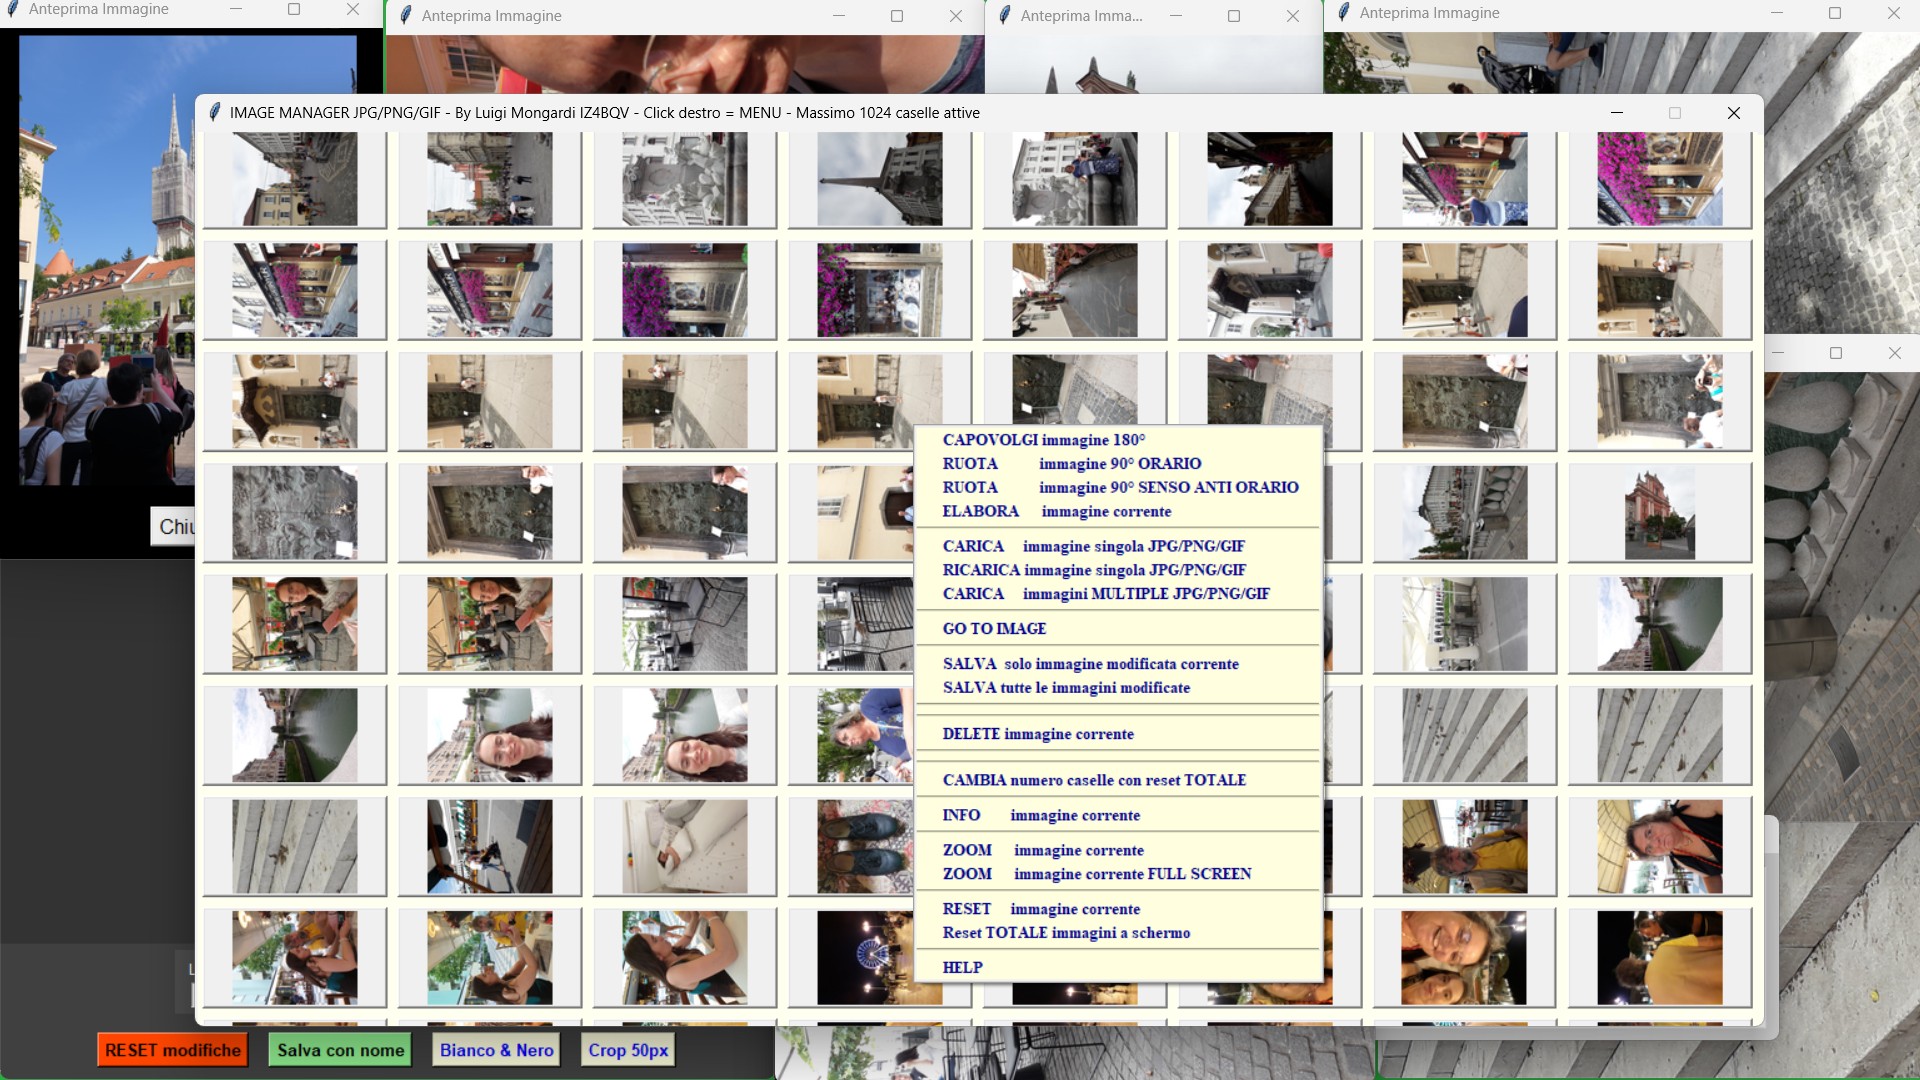
1. A cosa serve
JPGMANAGER permette di esaminare e sistemare raccolte di fotografie attraverso un tabellone di miniature. È pensato per un lavoro pratico e ripetitivo: individuare le foto da ruotare, guardarle ingrandite, eliminare quelle inutili, eseguire correzioni e salvare il risultato.
Il programma gestisce immagini JPG, PNG e GIF e mette a disposizione fino a 2.048 caselle per sessione di lavoro, organizzate in otto colonne. Questo è il limite del tabellone, non la dimensione massima dell’archivio: terminato un gruppo di fotografie, si può svuotare il tabellone e proseguire con il successivo.
Una caratteristica particolarmente utile è la possibilità di riunire sullo stesso tabellone fotografie provenienti da cartelle diverse. Ogni immagine conserva il proprio percorso: quando si salvano insieme le rotazioni, ciascun file viene aggiornato nella sua cartella, senza dover separare nuovamente le fotografie.
1. What it does
JPGMANAGER lets you review and organise collections of photographs using a grid of thumbnails. It is designed for practical, repetitive work: finding photos that need rotating, viewing them enlarged, deleting unwanted ones, making adjustments and saving the results.
The program supports JPG, PNG and GIF images and provides up to 2,048 slots per working session, arranged in eight columns. This is the capacity of the grid, not the maximum size of your collection: once you have finished a group of photographs, you can clear the grid and continue with the next group.
A particularly useful feature is the ability to bring photographs from different folders together in the same grid. Each image retains its own file path: when you save rotations in one operation, each file is updated in its own folder, without having to separate the photographs again.
2. Prima di cominciare
Per prendere confidenza con i comandi, conviene lavorare su una copia delle cartelle originali. Il programma opera sui file selezionati: il salvataggio delle rotazioni li sovrascrive e DELETE li elimina direttamente.
La cancellazione è immediata, senza domanda di conferma e senza passaggio nel Cestino di Windows. È una scelta che rende rapida la selezione delle fotografie, ma richiede attenzione. Il programma non offre un comando per annullare una cancellazione.
Avviare l’eseguibile nella lingua desiderata. Il tabellone iniziale presenta caselle numerate con la scritta «Carica file JPG». I comandi principali si aprono con il clic destro su una casella; quelli relativi a una singola immagine agiscono sulla casella da cui si è aperto il menu.
2. Before you begin
To become familiar with the controls, it is advisable to work on a copy of the original folders. The program operates on the selected files: saving rotations overwrites them, and DELETE removes them directly.
Deletion is immediate, with no confirmation prompt and without moving the file to the Windows Recycle Bin. This makes sorting photographs faster, but requires care. The program does not provide a command to undo a deletion.
Start the executable in your preferred language. The initial grid contains numbered slots displaying " Load JPG file " . Right-click a slot to open the main commands; commands for an individual image apply to the slot from which you opened the menu.
3. La prima sessione, passo per passo
- Fare clic destro su una casella e scegliere CARICA o APPENDI immagini multiple JPG/PNG/GIF .
- Aprire la cartella desiderata e selezionare le fotografie. Nella finestra di scelta dei file si possono usare Ctrl per selezionare elementi separati, Maiusc per un intervallo e Ctrl+A per selezionare tutti i file visualizzati.
- Confermare e attendere il completamento del contatore di caricamento.
- La prima fotografia caricata diventa l’immagine attiva, riconoscibile dalla casella rossa.
- Esaminare le miniature; ruotare le fotografie che lo richiedono oppure aprirle in anteprima con un doppio clic.
- Eliminare solo le immagini che si vogliono davvero cancellare dal disco.
- Scegliere SALVA tutte le immagini modificate per registrare le rotazioni e confermare la sovrascrittura.
- Terminato il gruppo, usare RESET TOTALE immagini a schermo per liberare il tabellone e iniziare un nuovo lavoro.
Le correzioni eseguite nella finestra ELABORA hanno un proprio salvataggio: sono spiegate nel capitolo 8.
3. Your first session, step by step
- Right-click a slot and choose LOAD or APPEND multiple images JPG/PNG/GIF .
- Open the desired folder and select the photographs. In the file selection window, you can use Ctrl to select separate items, Shift to select a range, and Ctrl+A to select all displayed files.
- Confirm and wait for the loading counter to finish.
- The first photograph loaded becomes the active image, identified by its red slot.
- Review the thumbnails; rotate photographs as needed or double-click them to open a preview.
- Delete only the images you really want to remove from the disk.
- Choose SAVE all modified images to save the rotations and confirm overwriting.
- Once you have finished the group, use FULL RESET images on screen to clear the grid and begin a new task.
Adjustments made in the EDIT window have their own saving procedure, explained in Chapter 8.
4. Caricare altre immagini e lavorare su più cartelle
Il comando di caricamento multiplo si adatta allo stato del tabellone:
- se il tabellone è vuoto, il caricamento parte dalla casella 1;
- se contiene già immagini, le nuove fotografie vengono aggiunte dopo l’ultima posizione usata;
- la prima fotografia del nuovo gruppo diventa rossa e viene portata in vista.
Esempio: dopo aver caricato 100 fotografie, aggiungendone altre 30 si occupano le caselle dalla 101 alla 130. Le prime 100 restano al loro posto.
Per lavorare su cartelle diverse, ripetere il comando di caricamento: selezionare prima le foto della cartella A, poi quelle della cartella B e così via. Non occorre riunire fisicamente i file in una cartella unica.
Il salvataggio collettivo delle rotazioni rispetta i percorsi di provenienza. Anche due immagini con lo stesso nome, ma situate in cartelle diverse, rimangono associate ai rispettivi percorsi. DELETE elimina il file corrispondente alla fotografia scelta, nella sua cartella.
Caselle disponibili
L’aggiunta multipla procede in coda: non riempie automaticamente i vuoti lasciati in mezzo al tabellone. Le caselle gialle delle immagini eliminate sono considerate posizioni già usate, anche quando si trovano alla fine.
Se le foto selezionate superano lo spazio disponibile in coda, il programma avvisa e carica soltanto quelle che possono entrare. Se la coda è piena, occorre terminare e salvare il lavoro, quindi eseguire un RESET TOTALE .
Caricamento e ricaricamento singoli
CARICA immagine singola JPG/PNG/GIF inserisce un file nella casella da cui si è aperto il menu. Può servire anche per riutilizzare una posizione vuota o gialla. Se si sceglie una casella occupata, il suo contenuto sul tabellone viene sostituito: salvare prima eventuali rotazioni pendenti.
RICARICA immagine singola JPG/PNG/GIF rilegge dal disco lo stesso file. È utile, per esempio, dopo averlo sovrascritto dall’editor. La ricarica scarta le rotazioni non ancora salvate associate a quella casella.
4. Loading more images and working with several folders
The multiple-image loading command adapts to the state of the grid:
- if the grid is empty, loading starts at slot 1;
- if it already contains images, new photographs are appended after the last used position;
- the first photograph in the new group becomes red and is brought into view.
Example: after loading 100 photographs, adding another 30 fills slots 101 to 130. The first 100 remain in place.
To work with different folders, repeat the loading command: select the photos from folder A first, then those from folder B, and so on. There is no need to physically gather the files into a single folder.
Saving rotations together preserves the original file paths. Even two images with the same name in different folders remain associated with their respective paths. DELETE removes the file corresponding to the selected photograph from its own folder.
Available slots
Multiple-image loading appends images at the end: it does not automatically fill gaps left in the middle of the grid. Yellow slots belonging to deleted images count as used positions, even when they are at the end.
If the selected photos exceed the space available at the end, the program displays a warning and loads only those that fit. If there is no space left at the end, finish and save your work, then perform a FULL RESET .
Loading and reloading individual images
LOAD single image JPG/PNG/GIF places a file in the slot from which you opened the menu. You can also use it to reuse an empty or yellow slot. If you choose an occupied slot, its contents in the grid are replaced: save any pending rotations first.
RELOAD single image JPG/PNG/GIF reads the same file from disk again. This is useful, for example, after overwriting it in the editor. Reloading discards any unsaved rotations associated with that slot.
5. Orientarsi nel tabellone
I colori hanno un significato preciso:
| Aspetto della casella | Significato |
|---|---|
| Miniatura su fondo normale | Immagine caricata |
| Fondo rosso | Immagine attiva |
| Fondo giallo con «IMMAGINE CANCEL LATA» | File eliminato tramite DELETE |
| «Carica file JPG» | Casella vuota, disponibile per un caricamento singolo |
Il rosso indica la selezione, non una modifica ancora da salvare.
Un clic sinistro seleziona una foto. La rotellina del mouse e la barra verticale permettono di scorrere il tabellone. Per spostare la selezione si usano i tasti freccia della tastiera.
| Comando nella griglia | Effetto |
|---|---|
| Freccia sinistra / destra | Seleziona la foto precedente / successiva disponibile |
| Freccia su / giù | Cerca una foto nella stessa colonna, nelle righe precedenti / successive |
| Invio | Apre l’immagine attiva a schermo intero |
| Doppio clic sulla miniatura | Apre l’anteprima |
| Clic destro | Apre il menu della casella |
La navigazione salta le posizioni senza immagini disponibili e si arresta ai limiti: non riparte automaticamente dalla prima foto dopo l’ultima.
GO TO IMAGE permette di inserire il numero di una casella e raggiungerla direttamente. Se contiene un’immagine disponibile, il programma la porta in vista e la evidenzia in rosso; altrimenti presenta un avviso. Il numero richiesto è quello della posizione sul tabellone, non parte del nome del file.
5. Finding your way around the grid
The colours have specific meanings:
| Slot appearance | Meaning |
|---|---|
| Thumbnail on a normal background | Loaded image |
| Red background | Active image |
| Yellow background with " IMAGE DELETE D " | File deleted using DELETE |
| " Load JPG file " | Empty slot, available for loading an individual image |
Red indicates selection, not an unsaved change.
Left-click to select a photo. The mouse wheel and vertical scrollbar let you scroll through the grid. Use the arrow keys on the keyboard to move the selection.
| Grid command | Effect |
|---|---|
| Left / right arrow | Selects the previous / next available photo |
| Up / down arrow | Looks for a photo in the same column in previous / following rows |
| Enter | Opens the active image in full screen |
| Double-click a thumbnail | Opens the preview |
| Right-click | Opens the slot ' s menu |
Navigation skips positions with no available images and stops at the boundaries: it does not automatically return to the first photo after the last one.
GO TO IMAGE lets you enter a slot number and go directly to it. If it contains an available image, the program brings it into view and highlights it in red; otherwise, it displays a warning. The number requested is the position in the grid, not part of the file name.
6. Anteprima e schermo intero
L’anteprima consente di controllare una fotografia in una finestra più grande della miniatura. Il full screen la presenta adattata allo schermo, conservandone le proporzioni.
È prevista una sola finestra per ciascuna delle due modalità: aprendo una nuova anteprima si sostituisce quella precedente; lo stesso vale per il full screen.
| Comando | Anteprima | Full screen |
|---|---|---|
| Sinistra / destra | Foto precedente / successiva | Foto precedente / successiva |
| Su / giù | Navigazione per righe, a passi di otto posizioni | Non previste per la navigazione |
| Canc / Delete | Elimina la foto visualizzata | Elimina la foto visualizzata |
| Clic destro | Apre i comandi disponibili sulla foto | Apre i comandi disponibili sulla foto |
| Chiusura | Pulsante Chiudi o chiusura della finestra | Esc o comando di chiusura nel menu |
Navigare con i tasti freccia della tastiera
Con la finestra di anteprima attiva, premere il tasto freccia SINISTRA per passare alla fotografia precedente e DESTRA per passare alla successiva. I tasti freccia SU e GIÙ permettono di spostarsi nella stessa colonna tra le righe del tabellone, a passi di otto posizioni, saltando quelle non disponibili.
In full screen si usano i tasti freccia SINISTRA e DESTRA della tastiera per scorrere le fotografie. Non occorre chiudere la vista e tornare alle miniature a ogni passaggio. I tasti SU e GIÙ non sono previsti per la navigazione in questa modalità.
Dopo aver eliminato una fotografia con Canc/Delete, se viene mostrata la successiva, si può continuare subito a usare i tasti freccia nella stessa finestra. Alla fine della raccolta non è previsto il ritorno automatico alla prima immagine.
Dal menu delle due viste si possono effettuare rotazioni rapide, aprire ELABORA ed eliminare la fotografia. L’anteprima offre anche INFO e il passaggio al full screen.
Dopo una cancellazione, se esiste una foto successiva, questa viene visualizzata nella stessa finestra e le frecce restano utilizzabili. Se non esistono foto successive, la vista si chiude e, quando disponibile, viene selezionata una foto precedente sul tabellone. La casella del file eliminato rimane gialla.
6. Preview and full screen
The preview lets you inspect a photograph in a window larger than its thumbnail. Full screen displays it fitted to the screen, preserving its proportions.
There is only one window for each of these two modes: opening a new preview replaces the previous one; the same applies to full screen.
| Command | Preview | Full screen |
|---|---|---|
| Left / right | Previous / next photo | Previous / next photo |
| Up / down | Navigation by rows, in steps of eight positions | Not used for navigation |
| Del / Delete | Deletes the displayed photo | Deletes the displayed photo |
| Right-click | Opens the commands available for the photo | Opens the commands available for the photo |
| Close | Close button or window close control | Esc or the close command in the menu |
Navigating with the arrow keys on the keyboard
With the preview window active, press the LEFT arrow key to move to the previous photograph and RIGHT to move to the next one. The UP and DOWN arrow keys move within the same column between rows of the grid, in steps of eight positions, skipping unavailable positions.
In full screen, use the LEFT and RIGHT arrow keys on the keyboard to browse photographs. There is no need to close the view and return to the thumbnails each time. The UP and DOWN keys are not used for navigation in this mode.
After deleting a photograph with Del/Delete, if the next one is displayed, you can immediately continue using the arrow keys in the same window. At the end of the collection, there is no automatic return to the first image.
The menus in both views let you perform quick rotations, open EDIT and delete the photograph. The preview also provides INFO and the option to switch to full screen.
After a deletion, if there is a next photo, it is displayed in the same window and the arrow keys remain usable. If there are no subsequent photos, the view closes and a previous photo is selected in the grid, when available. The deleted file ' s slot remains yellow.
7. Rotazioni rapide e salvataggio collettivo
I tre comandi di orientamento sono:
- CAPOVOLGI immagine 180°;
- RUOTA immagine 90° ORARIO;
- RUOTA immagine 90° SENSO ANTI ORARIO.
Si possono applicare più volte fino a ottenere l’orientamento desiderato. La miniatura mostra la rotazione, ma il file sul disco viene aggiornato soltanto al salvataggio.
SALVA solo immagine modificata corrente registra la rotazione della foto scelta, sovrascrivendo il suo file. Se non risulta una rotazione pendente, il programma lo segnala.
SALVA tutte le immagini modificate raccoglie le fotografie con rotazioni pendenti, chiede conferma della sovrascrittura e presenta il contatore di avanzamento. Le immagini non ruotate non vengono incluse in questo salvataggio.
Per le fotografie provenienti da cartelle diverse non serve alcuna scelta aggiuntiva della destinazione: ogni file viene salvato nel percorso dal quale è stato caricato.
7. Quick rotations and saving in one operation
The three orientation commands are:
- FLIP image 180°;
- ROTATE image 90° CLOCKWISE;
- ROTATE image 90° COUNTER-CLOCKWISE.
You can apply them repeatedly until you obtain the desired orientation. The thumbnail shows the rotation, but the file on disk is updated only when you save.
SAVE current modified image only records the rotation of the selected photo, overwriting its file. If there is no pending rotation, the program tells you.
SAVE all modified images gathers the photographs with pending rotations, asks you to confirm overwriting, and displays the progress counter. Images that have not been rotated are not included in this save operation.
For photographs from different folders, no additional destination selection is needed: each file is saved to the path from which it was loaded.
8. Elaborare una fotografia
ELABORA immagine corrente apre l’editor per le correzioni individuali. L’editor parte dall’immagine salvata sul disco: se si è appena effettuata una rotazione rapida sul tabellone, salvarla prima di aprire ELABORA .
Le regolazioni disponibili sono:
| Regolazione | Uso |
|---|---|
| Luminosità | Schiarisce o scurisce l’immagine; 1 è il valore iniziale |
| Contrasto | Aumenta o riduce il contrasto; 1 è il valore iniziale |
| Saturazione | Regola l’intensità dei colori; 1 è il valore iniziale, 0 elimina il colore |
| Rotazione (°) | Regola l’inclinazione, con incrementi di mezzo grado |
| Bianco & Nero | Converte il risultato corrente in bianco e nero |
| Crop 50px | Ritaglia 50 pixel da ciascuno dei quattro lati |
Le regolazioni numeriche aggiornano l’anteprima. Crop 50px non è un ritaglio libero con il mouse: ogni pressione elimina una fascia regolare di 50 pixel per lato. Il comando segnala quando l’immagine è troppo piccola per proseguire.
Conviene eseguire prima le regolazioni numeriche e applicare per ultimi Crop e il pulsante Bianco & Nero: cambiando nuovamente un valore numerico, l’anteprima viene ricostruita dall’immagine iniziale e questi ultimi interventi vanno riapplicati.
RESET modifiche , all’interno dell’editor, riporta le regolazioni ai valori iniziali e ripristina l’immagine di partenza della finestra. Non annulla un file già salvato.
Salvare il lavoro dell’editor
Usare Salva con nome e scegliere nome, cartella e formato del risultato. Si può creare una nuova immagine oppure sovrascrivere un file esistente, previa conferma.
Le elaborazioni dell’editor non vengono raccolte da SALVA tutte le immagini modificate del tabellone. Vanno salvate direttamente dall’editor prima di chiuderlo; non bisogna affidarsi all’avviso delle rotazioni pendenti in uscita dal programma.
Dopo aver sovrascritto il file originale, usare RICARICA sulla sua casella per aggiornare la miniatura. Se si è creato un file con un nuovo nome, caricarlo se si desidera vederlo nel tabellone.
8. Editing a photograph
EDIT current image opens the editor for individual adjustments. The editor starts from the image saved on disk: if you have just applied a quick rotation in the grid, save it before opening EDIT .
The available adjustments are:
| Adjustment | Use |
|---|---|
| Brightness | Lightens or darkens the image; 1 is the initial value |
| Contrast | Increases or decreases contrast; 1 is the initial value |
| Saturation | Adjusts colour intensity; 1 is the initial value, 0 removes colour |
| Rotation (°) | Adjusts the angle in half-degree increments |
| Black & White | Converts the current result to black and white |
| Crop 50px | Crops 50 pixels from each of the four sides |
The numerical adjustments update the preview. Crop 50px is not a freehand crop using the mouse: each press removes an even strip of 50 pixels from each side. The command displays a warning when the image is too small to continue.
It is advisable to make numerical adjustments first and apply Crop and the Black & White button last: changing a numerical value again rebuilds the preview from the initial image, so those final operations must be reapplied.
RESET changes , inside the editor, restores the adjustments to their initial values and restores the window ' s starting image. It does not undo a file that has already been saved.
Saving your work in the editor
Use Save as and choose the name, folder and format for the result. You can create a new image or overwrite an existing file after confirmation.
Edits made in the editor are not included in the grid ' s SAVE all modified images command. They must be saved directly from the editor before closing it; do not rely on the pending-rotation warning when exiting the program.
After overwriting the original file, use RELOAD on its slot to update the thumbnail. If you have created a file with a new name, load it if you want to see it in the grid.
9. Eliminare, togliere dal tabellone o ricominciare
Queste operazioni hanno effetti diversi:
| Comando | Effetto sul tabellone | Effetto sul file |
|---|---|---|
| DELETE | Toglie la foto e lascia una casella gialla | Elimina il file dal disco |
| RESET immagine corrente | Svuota una casella | Non elimina il file; propone il salvataggio delle rotazioni pendenti |
| RESET TOTALE immagini a schermo | Svuota il tabellone | Non elimina i file; propone il salvataggio delle rotazioni pendenti |
| RESET modifiche nell’editor | Ripristina l’immagine iniziale dell’editor | Non cambia quanto già salvato sul disco |
Quando un RESET incontra rotazioni non salvate, offre due scelte:
- SALVA E RESETTA : salva le rotazioni interessate, mostrando il contatore, poi esegue il reset;
- RINUNCIA : annulla la richiesta di reset e lascia il lavoro com’è.
Alla chiusura del programma, la scelta diventa SALVA ED ESCI oppure RINUNCIA . Anche qui RINUNCIA significa rimanere nel programma con il lavoro intatto: non significa uscire scartando le modifiche. Senza rotazioni pendenti, la chiusura avviene normalmente.
9. Deleting, removing from the grid or starting again
These operations have different effects:
| Command | Effect on the grid | Effect on the file |
|---|---|---|
| DELETE | Removes the photo and leaves a yellow slot | Deletes the file from disk |
| RESET current image | Clears one slot | Does not delete the file; offers to save pending rotations |
| FULL RESET images on screen | Clears the grid | Does not delete the files; offers to save pending rotations |
| RESET changes in the editor | Restores the editor ' s initial image | Does not change anything already saved on disk |
When a RESET encounters unsaved rotations, it offers two choices:
- SAVE AND RESET : saves the relevant rotations, displaying the counter, then performs the reset;
- CANCEL : cancels the reset request and leaves your work unchanged.
When closing the program, the choices become SAVE AND EXIT or CANCEL . Here too, CANCEL means staying in the program with your work intact: it does not mean exiting and discarding changes. If there are no pending rotations, the program closes normally.
10. Scegliere il numero di caselle
CAMBIA numero caselle con reset TOTALE permette di scegliere una capacità da 64 a 2.048 caselle, in multipli di 64. Un valore intermedio viene arrotondato al multiplo superiore.
La modifica ricrea il tabellone e ne rimuove le immagini caricate. Usare questo comando all’inizio della sessione oppure dopo aver salvato tutto: questo specifico cambio di capacità non presenta il dialogo di salvataggio previsto dal normale RESET TOTALE .
10. Choosing the number of slots
CHANGE number of slots with FULL reset lets you choose a capacity from 64 to 2,048 slots, in multiples of 64. An intermediate value is rounded up to the next multiple.
The change recreates the grid and removes its loaded images. Use this command at the start of a session or after saving everything: this specific capacity change does not display the save dialog provided by the normal FULL RESET .
11. Copiare e spostare file
Tenendo premuto il pulsante sinistro su una miniatura e trascinando il mouse, al rilascio compare un menu con tre possibilità:
- Sposta su Desktop;
- Sposta in cartella…;
- Copia in cartella….
La destinazione viene stabilita dal comando scelto e dall’eventuale finestra di selezione della cartella. Il trascinamento serve ad aprire questo menu, non a riordinare le miniature.
Lo spostamento trasferisce il file e libera la sua casella; la copia conserva il file di partenza. Se nella destinazione esiste già un file con lo stesso nome, viene aggiunto un numero al nome del file trasferito.
Salvare le correzioni prima di copiare o spostare: questi comandi operano sul file già presente sul disco, non sulle rotazioni ancora da registrare. Dopo la copia il programma ricarica inoltre il file di partenza.
11. Copying and moving files
Hold down the left mouse button on a thumbnail and drag the mouse. When you release the button, a menu appears with three options:
- Move to Desktop;
- Move to folder…;
- Copy to folder….
The destination is determined by the command you choose and, where applicable, the folder selection window. Dragging opens this menu; it does not rearrange the thumbnails.
Moving transfers the file and clears its slot; copying keeps the source file. If a file with the same name already exists at the destination, a number is added to the transferred file ' s name.
Save your adjustments before copying or moving: these commands operate on the file already on disk, not on rotations that have yet to be saved. After copying, the program also reloads the source file.
12. Consultare le informazioni
INFO immagine corrente apre una finestra con numero della casella, nome e percorso del file, dimensioni in pixel e indicazione della dimensione del file. Quando presenti e leggibili, vengono riportati anche il modello della fotocamera e la data dello scatto ricavati dai dati EXIF.
Il percorso è particolarmente utile quando sul tabellone sono riunite fotografie provenienti da molte cartelle. L’assenza di informazioni EXIF non impedisce di lavorare sull’immagine.
12. Viewing information
INFO current image opens a window showing the slot number, file name and path, pixel dimensions and an indication of file size. When available and readable, the camera model and date taken are also shown, as obtained from the EXIF data.
The path is particularly useful when photographs from many folders are displayed together in the grid. Missing EXIF information does not prevent you from working on the image.
13. Un metodo pratico per archivi estesi
Per sistemare molte cartelle con poche fotografie ciascuna:
- Preparare le copie delle cartelle su cui lavorare.
- Caricare i gruppi in successione con CARICA o APPENDI.
- Controllare le miniature e correggere gli orientamenti.
- Passare in anteprima o full screen per valutare le fotografie dubbie ed eliminare quelle da scartare.
- Salvare insieme le rotazioni, mantenendo la distribuzione dei file nelle cartelle di provenienza.
- Eseguire le eventuali elaborazioni individuali e salvarle dall’editor.
- Controllare i risultati nelle cartelle, quindi svuotare il tabellone e passare al gruppo successivo.
Durante il collaudo sul campo, l’autore ha lavorato su circa 1.500 fotografie provenienti da almeno 30 cartelle, usando anche caricamenti successivi da più cartelle nella stessa sessione. Il lavoro ha permesso di verificare il comportamento del programma nelle operazioni quotidiane, oltre ai controlli mirati sulle singole funzioni.
13. A practical workflow for large collections
To organise many folders containing a few photographs each:
- Prepare copies of the folders you will be working on.
- Load the groups in succession using LOAD or APPEND.
- Check the thumbnails and correct their orientations.
- Switch to preview or full screen to assess photographs you are unsure about and delete those you do not want to keep.
- Save the rotations together, preserving the distribution of files in their original folders.
- Make any individual edits and save them from the editor.
- Check the results in the folders, then clear the grid and move on to the next group.
During real-world testing, the author worked on approximately 1,500 photographs from at least 30 folders, including successive loads from several folders in the same session. This work made it possible to check the program ' s behaviour in everyday operations, in addition to targeted checks on individual functions.
Download del programma / Program downloads
Password di estrazione: IZ4BQV (MAIUSCOLO)
Extraction password: IZ4BQV (UPPERCASE)
Ogni archivio RAR contiene il programma e il manuale TXT nella rispettiva lingua: italiano in jpgmanager.rar, inglese in jpgmanagergb.rar. Non occorre scaricare le istruzioni separatamente. Estrarre i file prima di avviare il programma.
Each RAR archive contains the program and its TXT manual in the corresponding language: Italian in jpgmanager.rar, English in jpgmanagergb.rar. There is no need to download the instructions separately. Extract the files before running the program.
Eventuali segnalazioni antivirus devono essere verificate: non sono automaticamente falsi positivi.
Any antivirus detections should be checked; they are not automatically false positives.
Requisiti e licenza
Programma per Windows. Utilizzare l’eseguibile adatto al proprio sistema.
Il programma è 100% freeware . Può essere distribuito liberamente, anche a fini commerciali, senza alcun permesso.
Responsabilità
L’autore non garantisce la correttezza dei dati elaborati. L’utilizzo è a rischio e responsabilità dell’utente.
Requirements and licence
Windows application. Use the executable suitable for your system.
The program is 100% freeware . It may be freely distributed, including for commercial purposes, without permission.
Disclaimer
The author does not guarantee the accuracy of processed data. Use is at the user’s own risk and responsibility.